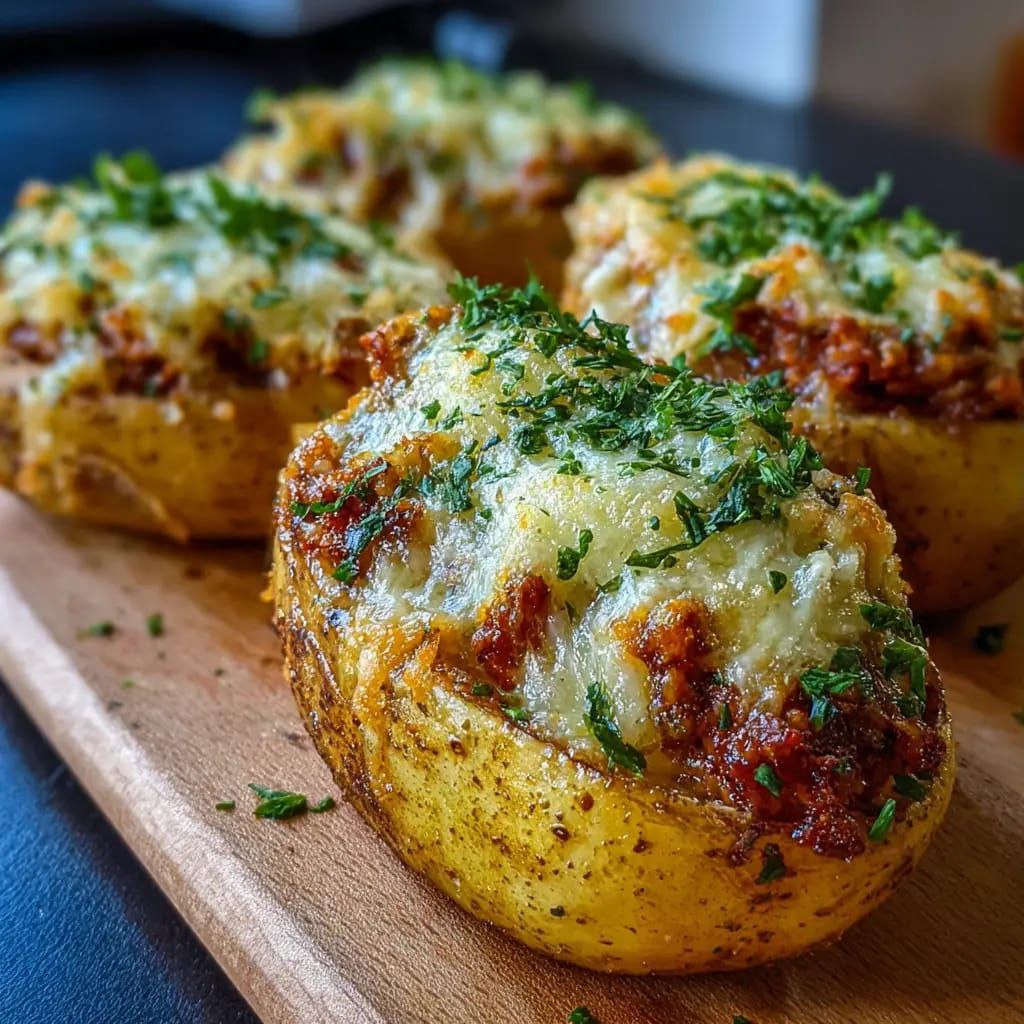
Let us be honest about something — a properly loaded baked potato is not a side dish. It never was. When you split open a potato with skin so crispy it crackles like a fireplace, and the inside is whipped into a cloud of butter and sour cream and cheese so fluffy it could float off the plate, and then you pile it high with every topping your heart desires — that is not an accompaniment. That is the main event. That is Tuesday night solved. That is the answer to “what do you want for dinner?” every single week until the end of time. And the beautiful truth is that a stuffed baked potato is one of the most forgiving, customizable, impossible-to-mess-up meals in all of cooking.
Quick Recipe Facts
- Calories: 480 kcal per serving
- Prep Time: 10 minutes
- Cook Time: 1 hour 10 minutes (mostly hands-off oven time)
- Servings: 4 servings
Simple Ingredients You’ll Need
For the baked potatoes:
- 4 large russet potatoes (the bigger the better — you want real estate for filling)
- 2 tablespoons olive oil
- 1 tablespoon coarse sea salt
For the filling:
- 4 tablespoons butter, softened
- 1/2 cup sour cream
- 1/3 cup whole milk
- 1 1/2 cups shredded sharp cheddar cheese, divided
- 1/4 cup grated Parmesan cheese
- 1/2 teaspoon garlic powder
- 1/2 teaspoon onion powder
- 1/2 teaspoon smoked paprika
- Salt and black pepper to taste
For the loaded toppings:
- 6 slices bacon, cooked crispy and crumbled
- 3 green onions, thinly sliced
- 1/2 cup sour cream (extra for serving)
- Fresh chives, finely chopped
- Flaky finishing salt
- Cracked black pepper
How to Make It: Step-by-Step
1. Choose the right potato — this is not a democracy of tubers. Russet potatoes are the only correct answer for a baked and stuffed potato. They have a high starch content and low moisture, which means the interior bakes up dry and fluffy instead of waxy and dense. A Yukon Gold or red potato will give you a gummy, gluey filling that no amount of butter can save. Scrub each potato under cold water and dry them thoroughly. Poke each one 8–10 times with a fork all over — these holes allow steam to escape during baking. Skip this and you risk a potato explosion in your oven, which sounds dramatic until you are the one cleaning it up at 10 PM.
2. The oil and salt crust — the detail that changes everything. Rub each potato generously with olive oil, coating every inch of the skin. Then roll them in coarse sea salt until they look like they just came back from a beach vacation. This is not just for flavor — though the flavor it delivers is remarkable. The oil conducts oven heat directly into the skin, crisping it into a shell that shatters when you press it. The salt draws out the last traces of surface moisture and creates a thin, crystallized crust that adds texture and seasoning simultaneously. Most people skip this step and end up with leathery, chewy skin that nobody eats. Do this and the skin becomes the best part of the entire potato — people will eat every last scrap.
3. Bake low, slow, and directly on the rack. Place the potatoes directly on the middle oven rack — no baking sheet, no foil wrap, no aluminum cradle. Direct contact with circulating oven heat on all sides is what produces evenly crispy skin all the way around. A baking sheet traps steam on the bottom and gives you one sad, soggy side. Bake at 400°F (200°C) for 60–70 minutes until a knife slides through the center with absolutely zero resistance and the skin feels tight and papery when you squeeze it with an oven mitt. If you love mastering fundamental techniques like this that make simple food extraordinary, my digital cookbook with 90+ easy recipes is built around exactly this philosophy — perfecting the basics until they become anything but basic.
4. The 5-minute cool-down that makes scooping possible. Remove the potatoes from the oven and let them sit for 5 minutes. Do not skip this — a potato fresh from the oven is a steam-filled grenade, and trying to handle one immediately leads to burned fingers, torn skin, and a filling that is too hot to mix properly. After 5 minutes, slice each potato in half lengthwise. Using a spoon, carefully scoop out the fluffy interior into a large bowl, leaving about a quarter-inch wall of potato attached to the skin. Those hollow skins are your serving vessels and they need to be sturdy enough to hold the filling without collapsing. Set them on a baking sheet cut-side up.
5. Whip the filling like your life depends on it. To the bowl of hot potato flesh, add the softened butter first — it melts on contact and begins to coat every starchy particle. Add the sour cream, milk, grated Parmesan, garlic powder, onion powder, and smoked paprika. Using a potato masher or a hand mixer on low speed, whip everything together until smooth, creamy, and ridiculously fluffy. Here is the principle — hot potato plus cold fat equals maximum absorption. The heat opens up the starch granules and the butter and sour cream rush in, creating a filling that is rich and velvety from the inside out rather than just greasy on the surface. Fold in one cup of the shredded cheddar and season with salt and pepper. Taste it. It should make you want to eat the entire bowl before it ever goes back into the potato skins. If it does not, add more butter. There is no such thing as too much butter in a stuffed potato.
6. Fill them with audacious generosity. Spoon the whipped filling back into each potato skin, mounding it high above the rim. Do not be polite about it — a flat, conservative stuffed potato is a sad potato. You want peaks and valleys and overflowing edges. The mounded filling gives you more surface area for the cheese topping to melt over and creates those gorgeous crispy edges where the filling meets the heat. Sprinkle the remaining half cup of shredded cheddar over each potato and top with crumbled bacon.
7. The second bake — where good becomes legendary. Slide the baking sheet back into the oven at 400°F for 12–15 minutes until the cheese is fully melted and bubbling, the bacon on top is sizzling, and the exposed edges of the filling have turned golden and slightly crusty. If you want an even more dramatic finish, switch to the broiler for the last 2 minutes — but watch closely because broilers operate on their own chaotic timeline and the difference between golden perfection and a charred disaster is about 45 seconds.
8. Load them up and serve like you mean it. Pull them out, let them cool for just 2 minutes, then go to work on the toppings. A generous dollop of cold sour cream on top of each hot potato — that temperature contrast is everything. Scatter sliced green onions and fresh chives over every surface. Hit them with a pinch of flaky finishing salt and a few cracks of fresh black pepper. The flaky salt on top of the melted cheese delivers these little explosions of crunch and salinity that regular table salt simply cannot match. Serve them on individual plates and watch people try to figure out how a baked potato became the most exciting thing they have eaten all week.
The kind of meal where the simplest ingredient becomes the most extraordinary plate on the table — that energy fills every page of my full collection of 90+ easy recipes. Proof that you do not need complicated to be unforgettable.
Frequently Asked Questions
Can I speed this up in the microwave? You can microwave the potatoes for 8–10 minutes to cook the interior, but you sacrifice all the crispy skin magic that makes this recipe special. If you are short on time, here is the compromise — microwave until just tender, then rub with oil and salt and bake at 425°F for 15 minutes to crisp the skin. You get the speed of the microwave with most of the texture of the oven.
What other toppings work for stuffed potatoes? The possibilities are endless. Pulled pork with barbecue sauce. Chili and cheese. Broccoli and cheddar. Buffalo chicken with blue cheese crumbles. Sautéed mushrooms and caramelized onions. Each combination turns the same base potato into an entirely different meal, which is what makes this recipe a weekly staple. For an entire collection of topping ideas and creative variations, explore my 90+ recipe digital cookbook.
My filling turned out gummy and gluey — what happened? You either used the wrong type of potato (waxy varieties like Yukon Gold become gluey when mashed) or you overworked the filling with a hand mixer. Starchy russet potatoes and a gentle hand are essential. Use a masher instead of a mixer if you tend to over-blend — a few small lumps are far better than gummy paste.
Can I make these ahead of time for a party? Yes, and they are perfect for entertaining. Assemble the stuffed potatoes completely, cover with plastic wrap, and refrigerate for up to 24 hours. When ready, bake uncovered at 375°F for 20–25 minutes until heated through and the cheese is bubbling. You can also freeze them individually wrapped in foil for up to 2 months — bake from frozen at 400°F for 30–35 minutes.
Final Pro Tip
Here is the technique that turns a great stuffed potato into an absurdly good one — bake the empty potato skins for 5 extra minutes before refilling them. After you scoop out the flesh, brush the inside of each hollow skin with a thin layer of melted butter and slide them back into the 400°F oven for 5 minutes. This pre-crisps the interior wall of the potato, creating a firm, golden shell that holds the filling without getting soggy. Most stuffed potatoes have a limp, steamy interior where the filling meets the skin — this extra step eliminates that entirely. You get crunch on the outside, crunch on the inside wall, and then that cloud of creamy, cheesy filling in the center. Three distinct textures in every single bite. Five minutes of extra effort. A completely different eating experience. For more techniques like this that quietly transform ordinary food into something people remember, do not miss my digital cookbook.