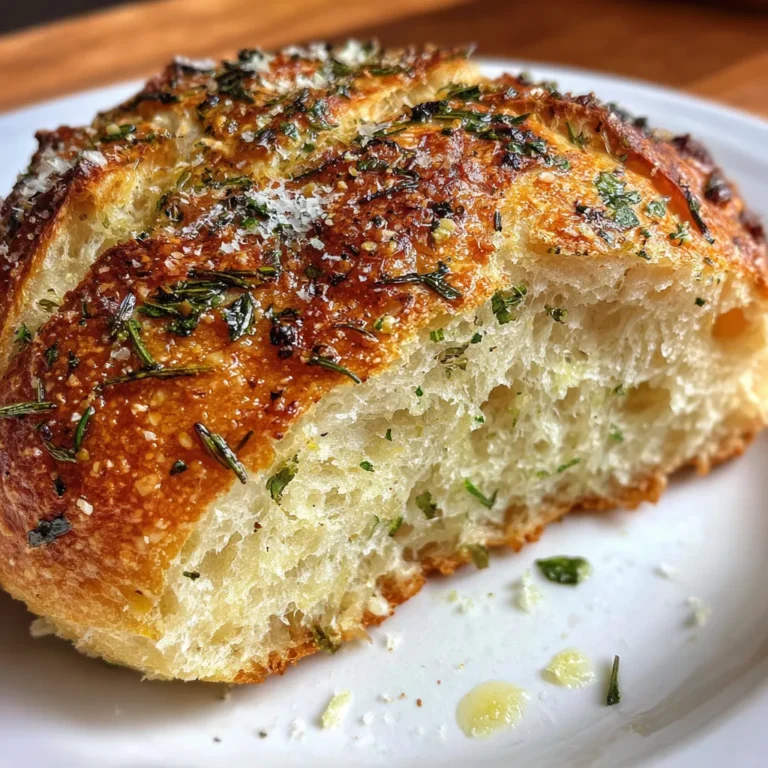
There’s something deeply comforting about baking bread at home. The scent of garlic drifting through the kitchen. The earthy aroma of rosemary and thyme warming in the oven. And that unmistakable crackle when you slice into a golden, crusty loaf fresh from the Dutch oven.
This Garlic Herb Dutch Oven Bread is everything you want in homemade artisan bread — crisp on the outside, soft and airy on the inside, and packed with flavor. The best part? It’s completely no-knead.
If you’ve ever wanted to master bakery-style bread without complicated techniques, this recipe is your starting point.
Why This No-Knead Dutch Oven Bread Works
Traditional artisan bread requires kneading, proofing techniques, and steam injection ovens. This method skips all of that.
Instead, it relies on:
- A long overnight fermentation
- High oven heat
- Steam trapped inside a preheated Dutch oven
The result is a beautifully blistered crust and an open, chewy crumb — the kind you’d expect from an expensive bakery loaf.
It’s one of the easiest ways to make homemade artisan bread in your own kitchen.
Ingredients for Garlic Herb Dutch Oven Bread
This rustic loaf uses simple pantry staples with fresh herbs for bold flavor.
Dry Ingredients
- 3 cups all-purpose flour
- 1 ½ teaspoons salt
- ½ teaspoon instant yeast
Wet Ingredients
- 1 ½ cups warm water (about 110°F)
- 3 tablespoons olive oil
Flavor Boosters
- 4 cloves garlic, minced
- 2 tablespoons fresh rosemary, chopped
- 1 tablespoon fresh thyme leaves
- 1 teaspoon black pepper
These ingredients combine to create a flavorful loaf perfect for serving alongside soups, pasta, or holiday dinners.
How to Make Garlic Herb Dutch Oven Bread
The beauty of this recipe is its simplicity. You only need one bowl and a little patience.
Step 1: Mix the Dry Ingredients
In a large mixing bowl, whisk together:
- Flour
- Salt
- Instant yeast
Make sure everything is evenly combined.
Step 2: Prepare the Herb-Infused Liquid
In a separate bowl, stir together:
- Warm water
- Olive oil
- Minced garlic
- Rosemary
- Thyme
- Black pepper
This step helps distribute the herbs evenly throughout the dough.
Step 3: Combine and Stir
Pour the wet mixture into the dry ingredients.
Stir with a wooden spoon or spatula until a shaggy, sticky dough forms.
Do not knead.
The dough will look rough and slightly messy — that’s exactly what you want.
Step 4: Let It Rise Overnight
Cover the bowl with plastic wrap or a damp towel.
Let it sit at room temperature for 12 to 18 hours.
By morning, the dough should be doubled in size and dotted with air bubbles. This long fermentation develops flavor and structure naturally.
Step 5: Preheat the Dutch Oven
Place your Dutch oven (with lid) inside the oven.
Preheat to 450°F for at least 30 minutes. The pot must be very hot before adding the dough.
This step creates the steam needed for a crisp artisan crust.
Step 6: Shape the Dough
Lightly flour your work surface.
Turn the dough out and gently fold the edges toward the center to form a round ball.
Avoid overhandling — too much manipulation can deflate those beautiful air pockets.
Step 7: Bake Covered
Carefully remove the hot Dutch oven.
Place a piece of parchment paper inside and lower the dough in seam-side down.
Cover with the lid and bake for 30 minutes.
This traps steam and creates oven spring.
Step 8: Bake Uncovered
Remove the lid and bake for another 15–20 minutes until the crust is deep golden brown.
The loaf should sound hollow when tapped on the bottom.
Step 9: Cool Before Slicing
Transfer the bread to a wire rack.
Let it cool for at least 30 minutes before slicing. This allows the interior crumb to set properly.
Why the Dutch Oven Method Is So Effective
A Dutch oven acts like a miniature professional bread oven.
It:
- Traps steam naturally
- Promotes even heat distribution
- Creates dramatic oven spring
- Produces a crispy artisan crust
If you want that classic bakery-style texture at home, this method delivers every time.
Tips for Perfect Garlic Herb Bread
Don’t Rush the Rise
The long fermentation is what gives this bread its complex flavor.
Use Fresh Herbs When Possible
Fresh rosemary and thyme provide stronger aroma and depth than dried.
Keep the Dough Sticky
Resist adding too much flour. A wetter dough equals a more open crumb.
Let It Cool Fully
Cutting too early can make the interior gummy.
Flavor Variations to Try
Once you master this basic loaf, the variations are endless.
Cheesy Garlic Bread
Fold in ½ cup shredded Parmesan or mozzarella before rising.
Roasted Garlic Version
Swap minced garlic for roasted garlic cloves for a sweeter flavor.
Mediterranean Style
Add chopped olives and a pinch of dried oregano.
Spicy Kick
Mix in red pepper flakes for subtle heat.
Best Ways to Serve Garlic Herb Dutch Oven Bread
This rustic loaf pairs beautifully with:
- Creamy tomato soup
- Beef stew
- Chicken noodle soup
- Pasta dishes
- Holiday roasts
You can also:
- Toast slices and top with bruschetta
- Dip in olive oil and balsamic vinegar
- Spread with compound butter
- Use for gourmet grilled cheese
It’s versatile enough to complement nearly any meal.
How to Store Homemade Artisan Bread
Proper storage keeps your loaf fresh and flavorful.
Room Temperature
Wrap loosely in a kitchen towel or place in a paper bag for up to 2 days.
Bread Box
A ventilated bread box helps maintain crust texture.
Freezer
Slice the loaf and store in an airtight freezer bag for up to one month.
Toast directly from frozen for best results.
Avoid refrigeration, as it accelerates staling.
Frequently Asked Questions
Can I Use Active Dry Yeast?
Yes. Use 1 ¼ teaspoons and proof it in warm water for 5–10 minutes before mixing.
Why Is My Dough So Sticky?
This is normal for no-knead bread. Lightly flour your hands when shaping.
How Do I Get an Extra Crispy Crust?
Bake uncovered slightly longer or allow full cooling on a rack.
Can I Use Dried Herbs?
Yes, but reduce the amount to about one-third of the fresh herb measurement.
Why This Bread Feels So Comforting
There’s something grounding about making bread from scratch.
It requires patience but very little effort.
The slow rise builds flavor while you sleep. The hot Dutch oven does the heavy lifting. And in under an hour of baking, you have a loaf that feels like it came from a European bakery.
Simple ingredients. Big reward.
Final Thoughts
If you’ve been searching for:
- Easy no-knead bread recipe
- Dutch oven artisan bread
- Homemade garlic herb bread
- Crusty rustic bread recipe
- Bakery-style bread at home
This Garlic Herb Dutch Oven Bread deserves a place in your kitchen.
It’s proof that simple ingredients, time, and heat can create something extraordinary.
Bake it once, and you’ll never look at store-bought bread the same way again.